

Android devices must have root access to make a full and complete application backup, without root access app data can be backed up but, will be encrypted.
For iOS devices, the iTunes backup password must be known if it has been set, if it is not known, you can use the password toolbox to brute force the PIN or password. Otherwise, MOBILedit Forensic will set the password to "123". If the application data cannot be retrieved from the encrypted iTunes backup, the device should be jailbroken.
-
Open MOBILedit Forensic and click "Start".
2. Connect the device with MOBILedit Forensic and hit “Next”.
3. Select “Logical extraction” and hit “Next”
4. If the “Connector installation” window is displayed, select “Install”. This is only for Android devices without a “Forensic Connector”. You may also be asked to update the “Forensic Connector” if it has previously been installed on the device.
5. Select “Application analysis” and then “Next”.
6. In the search bar or by scrolling the list, search for the application(s) you want to backup, select them by ticking the box and then click “Next”.
7. On this page you can specify the report details and make some notes etc. After that click “Next”.
8. Now you need to select “MOBILedit backup” as an export. Please make sure that after selecting it on the left side of the screen that you have set the radio button to “Same as report” under the “Content” selection before clicking “Next”.
9. Now select the export destination and name, and click “Export”.
By default, the “Export name” is the name of the phone together with timestamp when the extraction and analysis report was set up and the “Destination” field is a path you can freely set.
10. MOBILedit then starts performing the backup.
11. After a short time it will ask you to start an ADB backup, please select “Ok”. In the case of iOS devices it will ask you to enter the iTunes password, please enter the password or use the password toolbox and hit “Ok”.
12. After the extraction, click the "Result folder" button in the bottom left to view the result.
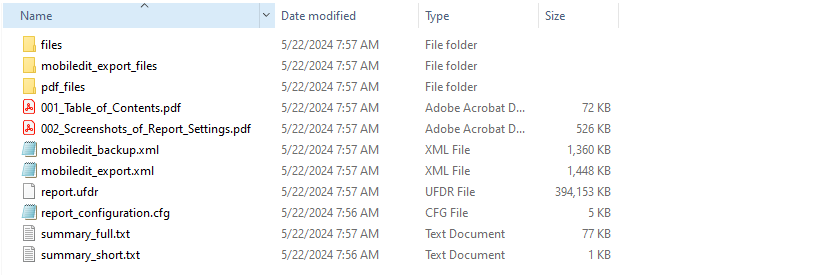
13. You should have a folder at the location you specified in step 9. The folder contains the mobiledit_backup.xml and the copy of files extracted from the device.
In cases where you need our help with analyzing some of the application make a zip of the whole folder and send it to us via email.
14. If you dig deeper into the backup_files folder, you will see it contains other subfolders called phone and a file called file_hashes.csv. In the phone folder, there are subfolders containing more subfolders and files.
The exact folders and files it contains and where they are located is application-dependent.
In application0 there is a folder with the same name as the name of the application package(s) analyzed (in our case it is com.olacabs.customer), and inside there is a folder called live_data containing all the data from the backed-up application,
.png?cb=9708a18c48469f76dc704d8d862868e6)
It is generally hard to say what data is important for further processing, and in which folders the data is because it is different for each and every application. Some applications hold all of their data here and are quite simple to examine and analyze, other applications contain all of the data yet are quite difficult to further process (they might be encrypted, etc..). Other applications don’t hold much data in the folder, yet hold their data somewhere on the cloud in online databases or somewhere else on the device. Thus, it is always determined on a case-by-case basis how to carry out low-level examinations of application packages.
If you can locate any databases they should contain some valuable data in SQL (in SQLite files). So this is the way to manually inspect for more data.
But here is an important note:
Never open the original database folder, because it can corrupt some data and you would have to make the backup once again.
If you want to inspect the SQLite file, make a copy of the database(s) first and open the copied file, NOT THE ORIGINAL ONE. What we would recommend is to copy the whole folder to another location on your workstation and work from that copy.
In order for us to further process and analyze an application from the backup, we will need the whole original folder. In the above example the folder has the name "Samsung Galaxy J3 2016 (2020-01-23 13h41m05s)".